Monday, May 5, 2008

Running an exe or program as SQL Server Job

This post will look into the scenario where we have some program\exe as part of some web project or any other project related to DB (even if it is not related to DB then also you can schedule it) and we want it to run recurring (frequency may vary). This can be achieved by SQL Server Agent which is a Windows service to run scheduled adminstrative tasks or commonly know as jobs (These are SQL jobs, you can schedule windows jobs too). SQL Server agent uses SQL Server t ostore job information. A job consists of steps which can be set using steps wizard during job scheduling. So how do we schedule a job for an exe to run every night 12 AM.

Job Scheduling process:

1) Connect to the SQL Server where you want to schedule your job.

2) Check if SQL Server Agent (you can find it at the bottom most entity) is running, if not run it and set it to run automatic.

3) Right Click SQL Server Agent. Select New -> Job. This will open a wizard to schedule a new job.

4) Select Steps from options given on the left side of wizard. This is the main place to set your exe\program as a running step. Give some name to this step, Select Operating System (cmd) for the Type and give the full path of exe in Text box for Command. Below is a sample step set up for running test.exe.

5) Now Select the job schedules option from left to set the frequency. Give some name to schedule, selection other options as shown in the figure below. This will set the job to run daily at 12 AM.


6) If you want you can set optional Alerts and notification (using SQL notification services) to send out email in case any things fails, succeeds or at any specific event.


7) The targets option set the DB to look at or put data in. It should commonly be the localhost but you can set a remote SQL Server too here in case you have some DB interaction but then make sure that the account which you are using should have access to the remote server.

Your job is now scheduled to run everyday test.exe. just to make sure that everything run properly go to Agent -> Jobs -> NEW_JOB (the one you just created), right click NEW_JOB and select "start job at step". This will run the job instantly for you and show the status if the job run successfully or failed. So now you finally done.

Do you know where the job information is stored. Its stored in the same SQL Server's system databases. You can find it under system databases -> msdb -> tables -> system tables -> sysjobs and related tables. All the information about your job is stored in this and other job related tables.

You can also quickly look into job activity monitor to see the current status of all the jobs. This helps in findind any issues with the jobs and correcting, if needed.

Hope this will help you in setting a SQL job for running an exe or program continuously.

bye for now.
my team @ http://india.rampgroup.com

Friday, May 2, 2008

TFS 2008 (Team Foundation Server) Set up and Usage

A few days before I started looking into TFS and tried to set it up for out project development environment for upcoming projects and to get a real testing of the product as well as how well it fits into our model\mode of development. Setting up itself was a different experience altogether. We were finding issues, searching for solutions, trying certain things by our own and eventually solved the issues and succeededd in installing TFS Server 2008.

The installation platform includes Windows Server 2008, TFS 2008, VS 2008, SQL Server 2005 with SP2 and Sharepoint Services 3.0. Windows Server 2008, TFS 2008, VS 2008, SQL Server 2005 were present on one system while the SharePoint Services 3.0 installed on other system such that Team portal for any Team project would be hosted on one system (remote system) and Reports would be published on another (host system). To configure remote system having Sharepoint server you would need to install WSS Extensions on it. You would need to run the TFS Server set up on remote machine and choose the last option (Install WSS Extensions).

TFS setup includes Server setup, TFS Server proxy, TFS Build, Team Explorer (or client setup) and WSS Extensions. For installation on Windows Server 2008 you would need to enable IIS 6.0 compatibility. Go to Server Manager and then Roles. Click add roles and select Web Server (IIS), locate IIS 6.0 from the list and select all the options. Continue and wizard will install IIS 6.0 compatibility components. I will write another post explaininig installation issues we faced and there solutions. There is one really cool feature of this setup which saves a lot of time during installation failure scenario. Before installing the components it looks for potential installation risks and compatibily check. It gives complete error message alerting you about what might cause an installation failure so that it can fixed before proceeding. One the check passes you are sure that installation success ratio would be very high.

TFS or Team Foundation Server serves as an integrated solution for a product development team including Bug Management System, Build Management System, Source Code Control and a Common Team Portal for Overall project management.

Once the TFS Server is setup and a team project has been created then you would need to create a solution\project and add that to source control.

Team needs to install TFS Client which comes as part of TFS Setup (just install Team Explorer which is TFS Client). Once Team Explorer is installed on your system VS will start showing Team Project in new\open project option. Open a Team project by connecting to your TFS Server and then you would be able to see the Team project. For the first time users, you would need to first add TFS Server by clicking Team project and then in the wizard click Add Server. In Visual Studio IDE on the right end you will now see Team Explorer window along with Solution explorer and other windows.

Go to Team Explorer click on the Team project you are going to work on (You will presented with the Team projects where you have been given access by the Team Project Administrators). You would need to check if you have permision to view team portal and report site (right click team project name and reports folder for this). You should be able to view both of these. Team Site can typically be found at http://[WSS_Server]/Sites/[TeamProject/ and report site at http://[Report_Server]/Reports/Pages/Folder.aspx?ItemPath=/[Team_Project]. If not, check with project admins for giving you permission in reports server and share point team site both. There are different roles which decide what all you can do on these portals.

Second task would be to add a solution from source control.

1) Check that your Source Control Provider is TFS.
2) If not, then go to Tools -> Options -> Source Control and change current value to TFS on the right pane.
3) Once you have TFS selected as your Source Control provider go to File Menu -> Source Control -> Open from Source Control and then you would be shown the projects in Source Control.
4) Select the one you are going to work on and then select a local directory. All files will be copied to your local directory and then you can open the solution from your local directory. You will be able to see the same in solution explorer.
5) Team explorer will help you with overall project management, your work items and tasks, build requests and check-in controls where as Solution explorer will help you with working on the project or project development.

Please try to play both with Team Explorer and Solution here and see what new options you find with respect to Source Control and Team portal. I have found some issues and scope of improvement regarding source control which I will be mentioning in one of my future blogs. Till then keep testing TFS, Team Explorer, Build, Test support and Source Control :)

bye for now.
my team @ http://india.rampgroup.com

Thursday, May 1, 2008

Search Engine Optimization (SEO) enabled development (tips and tricks)

So what is SEO aka Search Engine Optimization all about. To find the answer lets first look into an example so that we know why it is needed and what good it can do for you and your product\website. Suppose you launch a website for your product or any service what would you be aiming at. Surely about more views, more number of people clicking on your website or coming from different pages etc. but for this first of all people should know that there exists a product before they will go for it. Now to achieve this my product should come preferrable on the first page in Google search for people looking for similar products or services i.e. I would need a good ranking in Google search where most of things revolve around keywords, their context and how relevant your product is for any given search. Hence it becomes very necessary for a website to serve these requirements in order to get a good ranking or better indexing of your pages by search bots.

Bellow are some of the good practices we can do while the product\website development phase so that our site is SEO enabled along with first deployment itself.

Keywords Usage and How:
1) Keywords in Domain Name\URLs take priority in Ranking. This is very important. Here you can use domain parking so that you have more domains for you with relevant keywords in them and redirecting or pointing to you base website.

2) Have Keywords in Title Tag (Keyword in Title tag - close to beginning Title tag 10 - 60 characters, no special characters.)

3) Description Meta Tag (Shows theme - less than 200 chars. Google no longer seems to rely upon this tag, but will often use it. )

4) Keywords Meta Tag (Shows theme - less than 10 words. Every word in this tag MUST appear somewhere in the body text. If not, it can be penalized for irrelevance. No single word should appear more than twice. If not, it may be considered spam.)

5) Use Keywords for links. Try to make use relevant text for anchor texts.

6) All internal links should be working. Check using a link checker ( eg. http://validator.w3.org/checklink, Google for more)

7) Structure\Architecture. Pages should not be too deep. Try to have everything at max at a depth level of 3.

This means we should use the meta tags in our project as well as use relevant keywords such that they are also present in body text. This help in gaining priority for your keywords.

Now we will look upon a project structure and what all extra files we need for SEO and how the body and main page should be developed:

1) Use H1 tag for Header text as this gets higher priority. Use the h* tags for relevant titles\subtitles.

2) Always use the ALT tags and put relevant information there. Do not use alt text like "Fig1" etc. Search engines can not read your images and hence alt becomes so imp to get better indexed pages.

3) Use relevant page names, folder names etc. so that the path includes something meaningful and releavant to the product or its action.

4) Use meta tags in your master page so that it is present with full website. Use them under the "head" tag. Some example are:
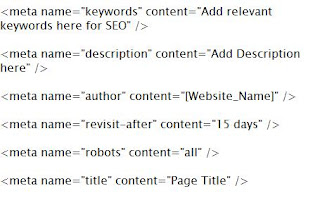

5) Seperate Java Script Code with the aspx files and put them under a common\default js file.

6) Add a Sitemap.xml file and put it under the root folder. Put the site links under url tags (Very important). You can get the sitemap.xml or txt file generated by several online tools like Google Webmasters tool (https://www.google.com/webmasters/tools/docs/en/sitemap-generator.html) or can search google for other.

7) Add a robots.txt file in the root folder. A sample file looks like:
# robots.txt for [sitename]
# everything is allowed to be indexed by search bots
User-agent: *
Disallow:
Sitemap: http://www.yoursite.com/sitemap.xml

There are again several online tools which can generate robots.txt for you. This file is required by the search bots to see what to index and what NOT to index.

8) Add autodiscover/autodiscover.xml file as many search bots look for autodiscover.xml file. Not having it would result into 404. If you have autodiscover already setup then no issues else there is way to just remove the 404 error by putting a blank xml file under [Root_Folder]\autodiscover\autodiscover.xml

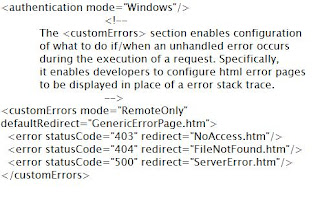
9) Use Error Pages for Generic Error\Specific error. Make changes in Web.config file and add the corresponding files in root folder. Put error pages for 404, 403, 500, 502 etc. Put the below text after "system.web" tag:


10) Put info.txt file in your root folder which contains basic information about your website. This helps the bots to know about your website. A sample info.txt file looks like:
#This text file includes very basic information about your website. Like :
url: http://test_url.com
site_owner:
address:
city:
state:
country:
postal_code:
phone_number:
display_email:
site_name:
Title:
site_description:

11) Use of urllist.txt file. This file contains the list of all the pages in your website. Google doesnt use this file but yahoo does you this so it would be a good practice to have even this in your root folder. you can use several online tool to generate txt sitemap for your website and use it as urllist.txt. One such tool can be found at http://www.akamarketing.com/text-sitemap-maker/

12) Take use of Google analytics tool which gives you website stats about the page visits, crawl stats and lot of useful information looking at which you can make necessary changes in your site such that it is better indexed and people are finding what they are looking for.

13) Use Google Webmaster tools where you can put your sitemap.xml which it will use to index your website. This along with the above techniques will help you in a better response. Its also a good practice to look at your sites Page Rank from availabe tools.

14) Try the leverage already good ranked websites for linking you. You can do this by using some of the blogs sites by blogging about you and linking your website there, using famous review websites as people go for reviews too, use the networking websites by making community etc and being a bit more active about your product. There are several other ways :) to let many people know that your product exists. Use them as it is very important for any website to be known.

So if you are working on a new project or existing one you can use the above mentioned techniques to get your website better indexed.

In one line - "People will buy a product only if it is there"

bye for now
my team @ http://india.rampgroup.com

Wednesday, April 30, 2008

Build Automation System using Cruise Control .NET (CCNET)

In a Team development environment where parallel development and testing goes we find a requirement of getting most recent build to test as well as some specific build to give the QA to do testing on. This post describes what all are needed to set up an automated source code integration and build system for an environment where we use Visual Studio for development, Some source control (VSS, Vault Gear etc) for source depot.

Why do we need a continuous source code integration and build system? well, this helps the QA team by allowing then to not spend more time in syncing the source and doing a build everytime or even working on a relatively older build. This works as a perfect backup for your Source Control and also your deployment server build. This also allows to align the builds numbers to be same as your assembly\file version and also to the source control label there by making a particular build to be a complete unit in itself in terms of readiness for deployment or using the same for development.

Now coming back to build server where we can use cruise control .NET for source integration along with a couple of batch scripts to control the build number and assembly version. CCNET pings the source control (VSS or Vault etc) after every 30 mins (this is a default value and can be changed) to see if there are any modifications. If there are then it triggers a build and publishes it on the Build Server. Once done sleeps again for 30 mins unless it is Forced for a build in between i.e. you can manually force a build in between sleeps.

Let me explain the two components of build server in details below:

1) Cruise Control .NET:
Its an open source build and integration engine which can be downloaded freely from http://confluence.public.thoughtworks.org/display/CCNET/DownloadOnce installation is done CCNET (CruiseControl.NET) needs to be configured according to your requirements. the config file can be found at "%SYSTEMDRIVE%\Program Files\CruiseControl.NET\Server\ccnet.config".
A Sample configuration looks like below (using Sample Project and Source Gear Vault as source control provider):


2) Batch Scripts (Same Build and Assembly Version):
There are two batch scripts used to control the assembly version. For any executable or dll assembly version is generated based on AssemblyVersion attribute defined in AsseblyInfo.cs file. In order to have same Label and assembly version we can use batch script to change the attribute at runtime and then revert the same at the end of build process again during runtime.

Once the source integration is done by CCNET and is ready for build we change the file attributes of AssemblyInfo files (more in case of multi project solution) to -R so that AssemblyVersion attribute can be changed to build label thereby making the version of generated dll's and exe's with the same version. Now to revert back we use another script which changes the AssemblyVersion attribute back to 1.0.0.0 and change the file attribute back to +R there by dodging the source control to not treat this as a modification otherwise it will consider this as a modification and trigger the build again and go to an infinite loop of build :)

For mutli project systems where you need many assemblyinfo files to be changed you can use some utilities like replace.exe http://www.bestcode.com/assets/downloads/replace/replace.exe
Below is an example of how a batch script would look like:
#Test1.bat
attrib /S -R AssemblyInfo.cs replace.exe -find "1.0.0.0" -replace "%CCNetLabel%" -fname AssemblyInfo.cs

Complete reference on the configuration blocks can be found at http://ccnet.sourceforge.net/CCNET/ One of the useful publisher which is missing in the above config is Email publisher where-in you can send mails for build success\failure to single\set of people. This help in tracking the build failures and also QA team notification in case of build succeeds.

This can very well be integrated with NUnit for executing test cases ones the build succeeds. This post doesnt cover this though more information on this can be found at CCNET link provided above.

There is a UI support too for CCNET to control the build trigger and view build results\logs. it can be found at http://[BuildServer]/ccnet . The web dashboard for ccnet looks like:


Hope this post will help in case you are planning to set up an automated build and integration system or you are looking for a solution to have same build and assembly version for you current systems builds.

bye for now.

Tuesday, April 29, 2008

my IE8 Beta 1 experience

IE8 Beta1 was released in March by Microsoft and I started using\testing it to see the new and visible features out of it. The official download site from Microsoft is http://www.microsoft.com/windows/products/winfamily/ie/ie8/customizelinks/default.mspx
Certain noticeable changes which I found in IE8 are:

1) The website address in address bar is grayed out except for just the main address eg. any pages from Microsoft.com is requested everything else grayed out except Microsoft.com.

2) Emulate IE7 button has been provided for the users who want to have the same browsing experience as IE7.

3) A quick link to web test recorder 9.0 which works well in conjunction with Visual Studio. ( in IE7 too )

4) Better Quick Tabs (Ctrl-Q) where we see a bigger and clear tab preview. (in IE7 too)

5) Ability to use and add new activities for any page.

6) One of the new additions in IE8 (already present in Mozilla) is the ability to save browsing sessions and hence when you close you browser with any website in opened state and then open IE again it asks to restore the session or start new. This is a good improvement in IE8.

7) Developer Tools -- Its the new and coolest addition in IE8 of all. This enables a user to have more closer look into the html\CSS and script used in any web page apart from having Script Debugging ability for any webpage which makes it a cool utility. It doesnt exactly has the same user experience as Visual Studio in terms of short-keys but has the same experience in showing watch\locals\callstack etc. This needs some more refinement in terms of the functionalities provided by Dev Tool bar which has been replaced by the developer tools. I hope those will be included in the future Betas.

Goodies from Developer Tools:
1) Debugging experience from within IE would enable a professional\hobbist to play around with any\developed webpage and find\correct any bugs in the page.
2) You can debug any of the javascript and Ajax code from the Developer Tools utility. This is a great boost for the ever increasing Ajax developers from Microsoft.

Some downsides of IE8:

1) Currently exisiting websites doesnt properly render on IE8 and I find a lot of style problems with IE8. This makes the browsing experience frustating as you try to interact with any website and it just does not respond properly and many of the controls either not work or are not properly rendered. I expect this to be rectified in coming releases.

2) Many of the Ajax controls like calender doesnt properly work in IE8. Trying to find out more :)

3) Devtool Bar doesnt get installed on IE8 (It would have been good to see it there until we get all the functionalities ported to developer tools) and even if you uninstall IE8 and try to install DevTool Bar it still doesnt get install. You need to uninstall IE8\IE7 and then only you can get it inistalled and working.

4) Developer Tools needs more improvement in terms of UX while debugging as a user expects the same experience as Visual Studio for short-keys at least.

Overall its good to install IE8 and test it but if you are looking from the development perpective or interacting with a lot of websites, then, I think its not completely ready yet.

Hope to have good time testing IE8.

bye for now.

Tip\Tricks for Visual Studio 2005\2008

Today we will look into some quickly accessible and useful features of Visual Studio IDE.

1) Open Solution or Project folder in Explorer – In VS 2005 you can view the containing folder for any file by right-click on IDE tab. In VS 2k8 you can view project folder in explorer from right-click to project name and finding a new entry named “Open Folder in Windows Explorer”. Same is shown below:


2) Vertical Split View – In VS2k8 the default split view of designer and source code is in horizontal orientation in case you want to have a vertical split view, which many a times is very useful in wide screen monitors, you can do the same by following:


Tools -> Options -> HTML Designer -> Check the box for Split View Vertically option on right pane.


3) How to Open a VS2k8 solution targeting .NET Framework 2.0 in VS 2k5 – Because of the multi-targeting support of VS2k8 we can even target .NET 2.0 Framework and just upgrade my old VS2k5 project to use VS2k8 but then my expectation would be that in case I need to open the same it should open perfectly in VS2k5 but it doesn’t happen. VS2k5 says that solution is created by a new version though in case of projects you can open the same in VS2005.


The differences in project file are addition of Tools Version = 3.5 in the first line and addition of 3.5 hence it works there is no problem with a tag for MSBuild. Though for IDE to read the solution file the change are version different in File Format which is set to 10.0 for VS2k8 solution.

It looks like:
Microsoft Visual Studio Solution File, Format Version 10.00
# Visual Studio 2008
Project("{FAE04EC0-301F-11D3-BF4B-00C04F79EFBC}") = "ConsoleApplication2", "ConsoleApplication2\ConsoleApplication2.csproj", "{42BEBBB6-AB4B-40B9-9CF6-345B62F8B5F4}"
EndProject

If we change the highlighted part to:
Microsoft Visual Studio Solution File, Format Version 9.00
# Visual Studio 2005
it works perfectly fine in VS2k5 too. The reason behind this is that there are no build\solution file format changes and hence just the version redirection make this solution file to work with a specific VS version.

More to be followed hence keep checking…

Thursday, April 24, 2008

How to enable CLR in SQL Server 2005

SQL Server 2k5 has .NET Integration as one of the cool features which enables writing Managed Code for user defined fucntions and then getting those running with SQL Server. SQL Server hosts the in process CLR for executing the user defined functions and referenced assemblies once CLR is enabled for SQL Server.

So lets see how we can do that...

Step1:
We need to use the SQL Server Surface Area Configuration for the same which can be found in your All Pragrams -> SQL Server 2005 as shown below


Step2:
Select Surface Area Configuration for Features from the Wizard


Step3:

Select "CLR Integration" from the left pane. And Check the box for enable CLR to get the required result


Hope this helps in case you want to add your Managed assembly or a function to the SQL Server and finding it not running because of CLR not enabled. Hope this blog will help you solve any such problem.

bye for now.